Tuesday, September 25, 2018

Lift your pitching to new heights!


When you use your legs to keep your core vertical into your front leg lift, you produce exceptional results. When your legs create a core tilt, you never really know where your next pitch will end up?

How “you” control “your body”.

 “You” can only move when “your body” senses your weight is between your knees.
  • “You” control your movements.
  • “Your body” instantly reacts to the way “you” decide to move.
  •  “Your body” only cares about getting your weight centered between your knees.
  • “Your body” doesn’t care how you want your body to move.
  •  Fortunately, “your body” follows very predictable reaction patterns.

 “You” have control over your movements. “Your body” uses obvious reaction patterns to produce what you see.

How to “you” create a productive front leg lift?

If you’re like most of the Pitchers we work with, “you” generate a productive front leg lift by thinking to (1) lift and push your front heel toward the corner base while “you” simultaneously (2) turn your hands to point your thumbs toward your knees.

Your front leg action creates an all-important separation between your knees while your simultaneous arm action stops any second-to-home core tilt. 
  •  These actions combine to get your throwing arm to instantaneously respond to your stride.
  • These actions create a vertical axis around which your body can rotate.
  • These actions keep your glove arm free to rotate down the mound.
  • These actions allow “your body” to deliver every pitch into a very tiny target window.

When “you” only lift your front leg, “your body” places all your weight over your back foot.
  • To move your body toward your target, “you” must create a forward weight shift.
  • When “your body” senses a forward weight shift, you end up with a core tilt.
  • With a core tilt, “your body” won’t let you complete your delivery until your core move back to vertical.
  • The more your core needs to move to vertical, the larger your target area.

A productive front leg keeps your weight centered within your knees and frees your arm to move the way “you” want.

Your front leg lift separates exceptional from ordinary.

Ending your front leg lift with a vertical core is a reaction.

Treating your vertical core as something “you” do and not a consequence of your actions is a complete waste of your time.

When you use your legs to keep your core vertical into your front leg lift, you produce exceptional results. When your legs create a core tilt, you never really know where your next pitch will end up?

Stop aiming and start pitching.

Bookmark this blog and, next week, we’ll go into how “you” use your front leg lift to get your legs to produce eye-popping results.

Let us know how you’re doing?
When you apply these last couple of blogs and still find yourself struggling with your command, send us a pitching motion video or attach a comment to this post. We’ll use your video and comments to resolve the movements standing in the way of you being exceptional.

Tell a friend!
Know a Pitcher struggling on the mound? Make sure to share this blog with them!
Want to fast track your personal improvement? Please feel free to contact me.

Skip Fast
Expert Pitching Coach
Professional Pitching Institute
E-Mail: skip@propitchinginstitute.com
Cell or Text: 856-524-3248

Copyright © 2018

Tuesday, September 18, 2018

How exceptional pitchers start!


A consistently small target window is essential to your pitching success. Your success begins with the way your “fight or flight response” interprets your movements into your starting position.
This blog tells you how to permanently eliminate
this very slight upper body tilt.
A consistently small target window is essential to your pitching success. Your success begins with the way your “fight or flight response” interprets your movements into your starting position.

An exceptional ending tells you how to begin.

At the end of your stride, to categorically outperform other pitchers, you create a 3-dimensional reaction where, to get your body back in balance,  your subconscious forces you to make a throwing (re)action. You make this happen by coming into your stride with ...
  1. 1 Your hips already level,
  2. Your upper body already vertical and  
  3. Your shoulders free and ready to respond.
Your consistent and exceptional performances are driven by this 3-dimensional starting position.


Your starting position separates exceptional from ordinary.

The only difference between a fully integrated, 3-dimensional ball release and a less-effective, 1-dimensional (shoulders only) ball release is your upper body angle as you complete your starting position.
       With a 3-dimensional starting position, you come out of your starting position with your upper body already forming the rotational axis. This type of preparation means, the instant you end your stride, your subconscious tendency to get your body back in balance means you instantaneously complete your delivery with exceptional command, maximum velocity and very late ball movement. 
       With a 1-dimensional starting position, you move down the mound with a home-to-second upper body tilt. When you let his happen, before you can complete your motion, you force your body to bring itself back to 3-dimensional standards. These preventable adjustments generate your current pitching struggles.

How do you create a 3-dimensional starting position?

Simple … you follow these clear-cut recommendations.
  1. Begin with your feet one baseball width apart.
       By beginning your motion with your feet any wider than this, the sway produced by your front foot lift means your subconscious creates an upper body tilt. 
       When you begin with your feet one baseball width apart, because your foot lift runs parallel to your upper body, you remain vertical.

  1. Make sure you begin with a slight back knee flex.
       Your feet can be one baseball width apart, but, because one leg is straighter than the other, when you lift your front foot, you force your subconscious to produce a slight upper body tilt. 
       To avoid this, you simply flex your knees. Your subconscious automatically centers your weight between your feet.  This simple flex effectively eliminates any chance your subconscious senses a weight shift.

If you currently end your starting position with even a slight upper body tilt, by adding these 2 simple skills to your mound routine, your worst misses end up closer to your target than ever!


Your foot placements are just the beginning.

Bookmark this blog and, next week, we’ll go into how to end your front leg lift with your 3-dimensional body position still intact.

Let us know how you’re doing?
When you use these skills and still find yourself struggling with your command, send us a pitching motion video or attach a comment to this post. We’ll use your video and comments to resolve the foot placements and leg orientations standing in the way of you being exceptional.

Tell a friend!
Know a Pitcher struggling on the mound? Make sure to share this blog with them!
Want to fast track your personal improvement? Please feel free to contact me.

Skip Fast
Expert Pitching Coach
Professional Pitching Institute
E-Mail: skip@propitchinginstitute.com
Cell or Text: 856-524-3248

Copyright © 2018

Tuesday, September 11, 2018

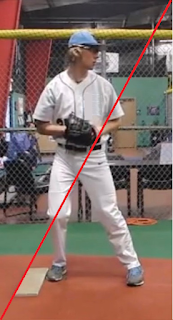
Lower body engagement isn’t something you “do”; it’s something we make “happen”!


Beginning with this foot placement means lower body engagement is a physical impossibility.
Your current Coach does his best to teach you to engage your lower body but continually fails!

Imagine how many hours you’ve spent “trying” to “do” what you know you need to do, your Coach knows you need to “do”, but no one has ever been able to teach you.

We’re proud to be the first to present 3 insanely simple tasks that’ll engage your lower body and, best yet, we do this without asking you to change your current throwing action.


Stop “trying”, start “doing”.

Getting your lower body to drive you results can happen as soon as your very next pitch.
Before you attack the 3 skills, let’s prepare you to engage your lower body.
1.       First, to eliminate unnecessary movements, work these skills from the stretch, not the wind-up (We’ll address the wind-up in a future post). 
2.       Make sure the area just in front of the rubber is level. Should this area need some maintenance, simply use the loose dirt around the rubber to fill in front of the rubber.
Now, perform these 3 simple tasks in this order …
1.       Begin with your feet one baseball width apart. 
2.       Simultaneously lift your front leg and bend at the waist. 
3.       Deliver your pitch so hard you’ll break the webbing on your receiver’s glove.


That’s all there is? It’s really that simple!

By using these skills to get your lower body to bring your throwing hand through the a consistently tiny release window, your pitches finish closer to your target than ever and, with little to no extra effort, you produce the exceptional results you always dreamed possible.


“Biomarkers” unequivocally prove these simple skills work.

Why is this so simple?
You have control over your back-foot orientation and your foot placements. As we talked about in last week’s post, everything past these 2 actions is a “biomarker” (“biological” + “marker” = your subconscious physiological reactions). The instant you treat your physiological reactions as controllable, you make it physically impossible to have your lower body drive your results.

The back-foot orientation, foot placements and front leg lift we present force a subconscious reaction that makes it possible for you to deliver every pitch into your Catcher’s target, always keep your Team close enough to win and challenge every Opponent to drive any pitch.

Let us know how you’re doing?
When you use these skills and still find yourself struggling with your command, send us a pitching motion video or attach a comment to this post. We’ll use your video and comments to resolve the movement that’s currently blocking your lower body from driving your results.

Bookmark this post.
Moving forward, every week we’ll present ways to refine these skills and the “biomarkers” (“biological”+ “markers” – see past posts for more on this) associated with each skill.

Tell a friend!
Know a Pitcher struggling on the mound, make sure to share this post with them.

Want personal coaching? Please feel free to contact me.

Skip Fast
Expert Pitching Coach
Professional Pitching Institute
E-Mail: skip@propitchinginstitute.com
Cell or Text: 856-524-3248

Copyright © 2018
Tuesday, September 4, 2018

Stop wondering how to improve your command!


Without seeing your motion, without asking you to change anything within your motion and after you make these foot placement changes talked about in this blog, you’re going to reduce how far and how often your Catcher moves his glove to receive your pitches.
In the past couple of weeks, I’ve discussed “biomarkers”. Now, let’s look at how to use your “biomarkers” to improve your command.

All roads lead to your foot placements.

By following your “biomarkers”, you instantly discover how to make yourself more competitive at your current level and beyond.
1.      Your body position at the top of your front leg lift is a physiological reaction (or “biomarker”) to your initial foot placements. As such, the only way to manage your body position at the top of your front leg lift is to change your initial foot placements
2.      Your arm, leg and hip movements as you move down the mound are physiological reactions to your body position at the top of your front leg lift. Accordingly, the only way to manage the movements you see as you move down the mound is to alter your body position into your front leg lift.
3.       Your results directly relate to how your subconscious uses your throwing arm path to, as you move down the mound, get your body back in balance. Consequently, your throwing arm path becomes a physiological reaction to how your body moves down the mound.

Based on what these “biomarkers” tell you, the only logical way to simply and permanently change or improve your results is to ADDRESS YOUR FOOT PLACEMENTS.

These are the foot placements that’ll instantly elevate your pitching results.

Without seeing your motion, without asking you to change anything within your motion and after you make these foot placement changes, you’re going to reduce how far and how often your Catcher moves his glove to receive your pitches.

From the stretch, begin your motion with your feet no wider than your hips.
This simple adjustment makes your subconscious less likely to need your throwing arm for balance and, with your throwing arm less involved with your balance, more likely to come through a much smaller and more consistent release window.

From your wind-up, to minimize any hip sway and keep your movements more vertical in nature, we teach “toe-heel, heel-toe”. 
You begin with your front toe in line with your back heel and your back heel in line with your front toe. To begin your motion, you simply place your back foot in front of the rubber, lift your front foot off the ground and then watch more pitches finish closer to your Catcher’s glove than ever.

When you realize something as simple as a change your foot placements helps your command, please let me know by sending me a short email.

Are these recommendations a universal fix?

Unfortunately, no, but they do represent a great starting point.
Your foot placement goal is to use your “biomarkers” to take away any reason for you to use your throwing arm for balance as you transition from your foot placement into your front foot lift.
Should you want to fast track your foot placements, please feel free to contact me.

Thanks for your time and remember … you are the pitcher you are because you’re listening to paint-by-number pitching solutions.

Skip Fast
Expert Pitching Coach
Professional Pitching Institute
E-Mail: skip@propitchinginstitute.com
Cell or Text: 856-524-3248

Copyright © 2018